
There’s something about the taste of a layer cake that makes it so decadent & delicious! There’s a depth of richness that happens when you stack all those yummy layers together. It is much like the richness that layers of fabric can bring to a dress!
When I was asked to sew flower girl dresses for two of my granddaughters in their first walk down the aisle, I welcomed the opportunity. Creating garments for special occasions is an exciting venture and can be quite a challenge. A wedding is an important event, and the photos will be enjoyed for generations to come. I feel the pressure to create the right look, knowing it is important for the girls’ dresses to coordinate with both the bride’s gown and the bridesmaids’ dresses. The bride and her mom selected the lace fabric and gave me free rein! I was thrilled to sew for this special occasion (and for my granddaughters!).
An outdoor wedding in September was the perfect setting to use some of my new embroidered polyester bobbinette lacy fabric. The classic & simple lines that the bride selected for her gown and her attendants’ gowns paired wonderfully with the sweet ‘Sophia’ pattern by Bonnie Blue Designs. Now that I had my pattern & main fabric in mind, the fun began…


The color of the bridesmaids’ dresses was “Biscotti” – a “neutral-taupe-hint of pink-ish” color. I had a photo only…and was trying to decide on the perfect color lining for this embroidered bobbinette fabric. Ivory lining made the dresses too creamy looking. Taupe lining made the dresses too “adult” looking. Nothing seemed to be “just right”.

The bride was able to send an actual fabric sample to me, and that made it easier to decide. There were so many options that were “pretty”, but when I needed to coordinate with the “biscotti” color as well as the bride’s gown (white), I found myself struggling with a final decision! (Anyone else ever suffer from “Analysis Paralysis”?)
I needed to tone down the ivory while playing up the soft pink-taupe hues of the embroidered netting. So, in order to accomplish my netting fabric ‘color-change’, I began to “layer my cake”!


After pulling satins & silks, polyesters & nylons, pinks & whites, creams & taupe; my dresses began to take shape! I finally decided on a pale blush pink silk faille fabric, ivory silk crepe de chine & the embroidered bobbinette fabric as the sheer overlay . The faille silk fabric had a light enough pink undertone to create the exact color that was needed, topped by the ivory of the silk & netting. Thankfully the pink faille fabric added just the right amount of opacity so that I didn’t have to add a slip.

I was going for a “color” – no matter what fabric I had to use to get that shade! If there had been a soft blush pink fabric in a different type silk, or even a cotton or a polyester lining, I would have preferred to use it. Faille has a texture and is really heavier than I needed a lining to be for this dress. Faille has an obvious cross-grain (kind of like Swiss wale pique, but the lines run from selvage to selvage). The “normal” way to cut & sew a skirt lining, the “straight of the grain” is the direction of the selvage edge. However, due to the texture of this fabric creating a strong cross-grain, gathering the top of the skirt lining became an issue. The faille weave wants to “pouf” when gathered. So, to avoid the “pouf”, I cut the skirt pieces opposite the grain – having the textured lines running vertically, and the fabric then gathered beautifully!
3 skirt layers:
Bottom layer – blush pink silk faille
Middle layer – ivory silk crepe de chine
Top layer – embroidered bobbinette lace fabric


HOW TO ATTACH ALL THOSE LAYERS:
1. Since the bobbinette has one embroidered border edge, I cut the entire skirt in one piece, using 90″ of length. This allows for one seam in the back of the skirt.
2. The silk crepe de chine was cut in two pieces, the full width to correspond with the width of the bobbinette. This fabric had side seams, and then I added a placket at the center skirt back.
3. The bobbinette was placed over the crepe de chine and the two layers were gathered together using 3 rows of gathering stitches. (The wrong side of the bobbinette was placed on the RIGHT side of the crepe de chine – so no seam allowances showed through the bobbinette).
4. This double skirt layer was then attached to the bodice.
5. The silk faille was cut with less width than the top two layers (approximately 60″ total width). Since it is cut “cross-grain”, like a border print would be cut, it only required one back seam, and that was sewn leaving approximately a 6″ opening at the top of the center back, which could be finished like a placket. The silk faille was then gathered, using 3 rows of gathering stitches, and then it was sewn to the dress bodice, wrong sides together. Now, all the seams were hidden!
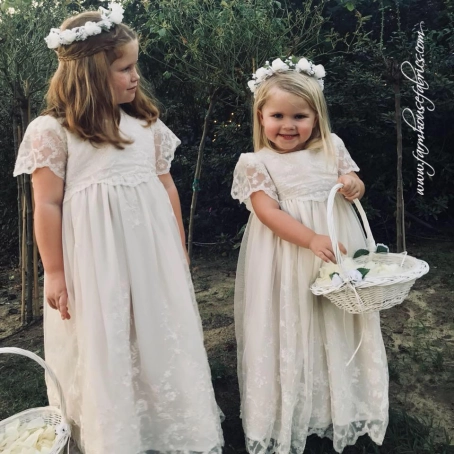
Everything came together perfectly – and the final color created by “layering” was just right! The girls were ready to walk down the aisle sprinkling rose petals for a gorgeous bride.
The bride, her flower girls & the entire wedding was absolutely beautiful!


Gorgeous!!
LikeLike
Beautiful!
LikeLike
Beautiful girls in beautiful dresses! Many bridesmaid dress designers will sell you yardage to match the bridesmaid gowns. Two of my children had very pregnant bridesmaids in their wedding parties which meant the gowns needed to be altered drastically. I will always remember how helpful you were to me when i was trying to match silk satin ribbon for my youngest daughters bridal gown sash.
LikeLike
I like the phrase “Analysis paralysis.” I had a good friend once observe that my creative process seemed to involve a significant amount of agonizing. It was not a complement. Still true. The dresses are beautiful! Thanks for sharing your process.
LikeLike
love this ❤
LikeLike
Beautiful! You did well to accomplish the perfect flower girl dresses
LikeLike